How to Use the Snake Method on a Charcoal Grill

Smoking-Meat.com is supported by its readers. We may earn an affiliate commission at no extra cost to you if you buy through a link on this page.
The snake method is a way of arranging charcoal so it burns gradually along a connected path, giving you several hours of cooking heat without having to keep adding another batch of charcoal.
If my recipes and barbecue guides have helped you over the years, becoming a member is one of the best ways to support my family's business. As a thank you, you'll enjoy every recipe and article completely ad free for less than $2 a month.
Ad free • Instant access • Cancel anytime
It’s especially useful when you want to smoke ribs, pork butt or another cut that needs a longer cooking time, but you’re using a charcoal grill instead of a dedicated smoker.
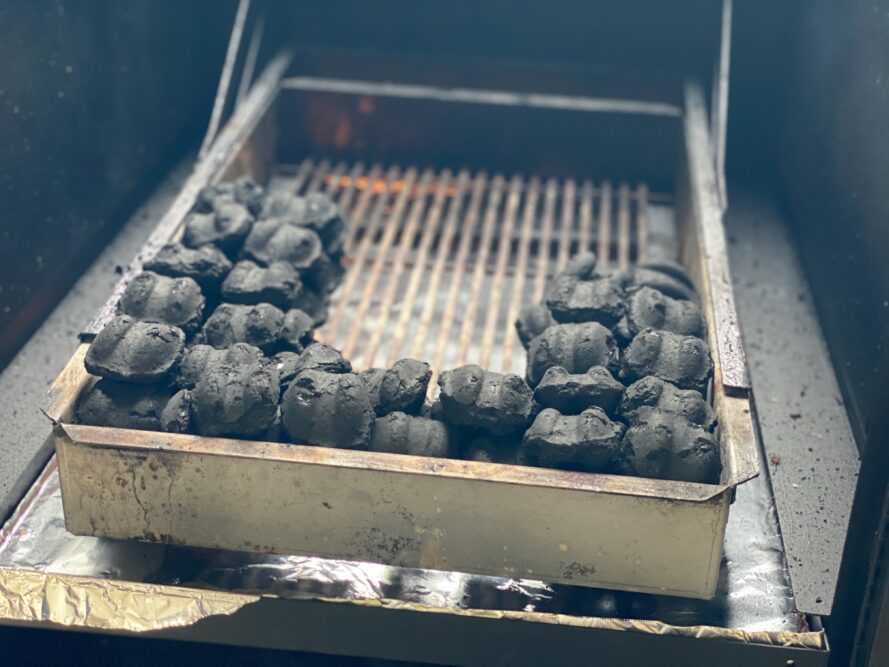
You’ll often see this demonstrated in a round kettle grill, with briquettes following the outside edge of the charcoal grate, but the snake doesn’t have to be round. The photos here show a setup I used in my Hasty Bake, where the charcoal follows the perimeter of a rectangular charcoal pan.
The important part is a continuous path of fuel, lit at one end, with enough separation to keep the fire from taking a shortcut into another section.
What Is the Snake Method?
The snake method, sometimes called the fuse method, uses touching charcoal briquettes to create a path that the fire can follow.
You light a small amount of charcoal and place it against the beginning of the snake. As that charcoal burns, it lights the next pieces, which light the pieces beside them, allowing the fire to progress through the arrangement.
Instead of having the entire fuel load burning at once, you have a smaller active fire moving through a larger supply of charcoal.
The length of the snake helps determine how long it can burn, while the width, number of layers and available airflow affect how much charcoal burns together and how much heat it produces.
A longer snake can give you more cooking time, but a thicker snake generally gives the fire more fuel to burn at once.
Which Grills Can Use the Snake Method?
A kettle grill is a convenient choice because its round charcoal grate leaves room for a curved charcoal arrangement around the outside and food over the open area toward the center.
A rectangular charcoal grill can use the same principle, provided there’s enough room to arrange the fuel and keep the food away from the burning charcoal.
The grill needs a lid and controllable airflow so you can maintain a cooking temperature. The same arrangement on an open grill won’t behave like a closed cooker.
You also need a way to keep the food out of direct heat as the fire travels. Depending on the grill, that may involve positioning the meat above an area without charcoal or using its intended heat deflector.
If you’re using a bullet or cabinet smoker with a charcoal basket underneath the food, the Minion method may be a more convenient way to arrange a long-burning fuel supply.
If you’re setting up a kettle, the kettle smoking guide covers the cooker as a whole, while two-zone grilling explains how the food stays in an indirect cooking area.
What Charcoal Should You Use?
Briquettes are a good starting point because their consistent shape makes it easier to build a connected path and repeat the arrangement on your next cook.
Lump charcoal can work, but the irregular pieces make it harder to maintain consistent contact and control how much fuel ignites together. For someone learning the snake method, briquettes remove some of that guesswork.
Use plain cooking briquettes rather than instant-light charcoal or charcoal treated with lighter fluid, since fresh fuel will be igniting throughout the cook.
Keep the charcoal dry and use reasonably intact pieces for the snake. Save badly broken briquettes for another lighting arrangement rather than trying to build a dependable path out of fragments.
My comparison of lump charcoal vs briquettes explains why uniform briquettes are convenient for a connected charcoal path, even though lump charcoal can work when its pieces are arranged carefully.
How to Set Up the Snake Method
Prepare the Grill
Start with a cool grill and remove leftover ash so the air openings are clear.
Install the charcoal grate or pan in its intended position, then make sure the grill is outdoors on a stable surface with the clearances required by its manufacturer.
Have your chimney starter, heat-resistant gloves, long tongs and thermometer ready before lighting anything.
Build a Connected Path of Charcoal
Arrange the briquettes along the outside of the charcoal grate or pan, following its shape while leaving an open area for indirect cooking.
For a typical 22-inch kettle, two rows of briquettes on the bottom with two rows on top are a common starting arrangement. That gives you a snake two briquettes wide and two layers high, although your charcoal, cooker and intended temperature may call for a different configuration.
The setup shown in my Hasty Bake uses the same connected-fuel principle in a rectangular pan. You don’t need to copy its exact dimensions or stack height to make the method work in another grill.
Lean or overlap the briquettes so neighboring pieces touch, including where the path turns a corner. A large gap can stop the fire before it reaches the remaining fuel.
Leave a clear separation between the beginning and end rather than completing a closed loop. You want the fire traveling along the path, without lighting the far end prematurely.
Position the Smoking Wood
Place a few small, dry wood chunks on the beginning and early portion of the snake so they produce smoke during the first part of the cook.
Start with a modest amount rather than covering the entire charcoal arrangement. You can adjust the amount on later cooks according to the flavor you get.
Keep the chunks small enough that they don’t bridge between separate sections of the snake, which could allow the fire to spread beyond the area you intended.
Pecan is one of my favorites, but apple, cherry, oak and hickory are also useful options. There’s no need to soak the chunks before using them.
My Smoking Wood Guide explains more about choosing wood for different foods.
Set Up the Indirect Cooking Area
Position a suitable drip pan underneath the food where your grill’s design allows it, keeping the pan clear of the charcoal and air openings.
For a low and slow kettle setup, warm water in the pan can help moderate the cooking temperature and catch drippings. Other grills may use a different arrangement, including a built-in heat deflector.
Use the indirect cooking setup intended for your cooker rather than assuming every grill needs a water pan.
Make sure the food will remain protected from direct heat throughout the snake’s path, not just above the section where the fire begins.
Light the Starting Charcoal
Light a small batch of briquettes separately in a chimney starter.
For a typical 22-inch kettle, about eight to ten lit briquettes is a useful starting reference, although charcoal size, weather and the cooker’s design can change what’s needed. Don’t apply that count automatically to every grill.
Let the starter charcoal become well lit and ashed over, then carefully place it against one end of the snake using heat-resistant gloves and long tongs.
Make sure the burning charcoal touches the first unlit section, while keeping it separated from the rest of the arrangement.
My Charcoal Chimney Starter Guide walks you through lighting the starter batch.
Bring the Grill Up to Temperature
Install the cooking grate and place a thermometer probe near the area where the food will cook, without letting it touch the metal grate.
Close the lid and watch the temperature as the grill warms.
For many low and slow recipes, you’ll be aiming between 225°F and 275°F (107°C and 135°C), but follow the temperature specified in the recipe.
Begin adjusting the intake airflow as the grill approaches your target, keeping an adequate exhaust opening for heat and smoke to move through the cooker. Make small changes and give each adjustment time to work.
If your grill has an adjustable charcoal grate, its height affects the heat reaching the food as well, so keep that setting consistent while learning the fuel arrangement.
Add the Food
Once the temperature is reasonably steady and the heavy startup smoke has cleared, place the food in the indirect cooking area.
Leave room around it for heat and smoke to circulate, and keep it away from any part of the charcoal path that will expose it to direct heat.
Close the lid and allow the grill to recover after adding the food before making another vent adjustment.
Keeping the Snake Burning Steadily
Watch the temperature trend, but don’t adjust the vents every time the thermometer moves a few degrees.
The fire will change slightly as fresh briquettes ignite and earlier pieces burn down. Your goal is a useful cooking range for the recipe rather than a number that never moves.
If you’re using water, check the pan periodically and refill carefully before it runs dry. An empty pan can change how the grill holds temperature.
For a longer cook, check the remaining charcoal before the fire reaches the end. If you need to extend the snake, carefully add more briquettes ahead of the burning section, maintaining contact without connecting it to another active part of the fire.
Use the grill’s intended access points and avoid moving hot grates, pans or other components unnecessarily.
How Long Will the Snake Method Burn?
There isn’t one dependable burn time for every charcoal snake.
The length and thickness of the arrangement, charcoal brand, cooking temperature, airflow and weather all affect how long the fuel lasts.
A longer snake gives you more fuel to work through, but you still need enough heat from the burning section to maintain your cooking temperature.
On the first few cooks, note the arrangement you used, how much charcoal you lit and how quickly the fire traveled. Those details will help you build the right amount for the next meal.
Troubleshooting the Snake Method
The Grill Is Running Too Hot
Check whether the starting batch was too large, the snake has more layers than the cooker needs or the fire has spread into another section.
Reduce the intake gradually and give the grill time to respond. If it consistently runs hotter than intended, try a smaller starting batch or a thinner arrangement on the next cook.
Also check whether a large wood chunk is helping the fire jump across the path.
The Fire Stops Partway Through
Look for a gap between briquettes, damp fuel or restricted airflow.
Carefully restore contact at the burning end if the fire is still active. If it has gone out, light a small batch separately and use that to restart the remaining charcoal.
Adding more unlit briquettes won’t solve a fire that no longer has enough burning fuel to ignite them.
The Temperature Drops Even Though the Snake Is Burning
Check that ash isn’t blocking the intake and that the burning section is large enough to supply the required heat.
Wind, falling outdoor temperatures and changes in the water pan can also affect the cook.
Make one correction at a time so you can see whether it helped. My Smoker Temperature Control Guide explains that process in more detail.
One Side of the Food Is Cooking Faster
The hottest area moves as the fire travels, so check the food’s position relative to the burning charcoal.
Rotate or reposition it when needed, while keeping it in the indirect cooking area. A large cut that overhangs the fuel path may need a different placement or a grill with more usable space.
Finishing the Cook
Follow your grill’s shutdown instructions when the food is ready.
On many conventional charcoal grills, closing the vents and leaving the lid shut helps extinguish the remaining fuel. Keep the grill outdoors until the charcoal and ash are completely cold.
Remove the cooled ash, save suitable dry, unburned charcoal for another cook and clean the grates and drip pan as needed.
Once you find an arrangement that maintains the cooking temperature you want, repeat it a few times before changing the charcoal or stack size. A consistent setup makes the snake method much easier to use.
For cooldown and cleanup, see the smoker shutdown guide and smoker cleaning guide. This method is part of my Ultimate Guide to Smokers, where you’ll find the individual cooker instructions as well.
Don’t Lose This Article
Enter your email and I’ll send a link to this article straight to your inbox so you can read it anytime.