
How to Trim Spare Ribs for Smoking

Smoking-Meat.com is supported by its readers. We may earn an affiliate commission at no extra cost to you if you buy through a link on this page.
A full slab of spare ribs gives you a rack to smoke and some useful trimmings, and turning it into a St. Louis style rack is easier once you know where the rib bones end. You are mainly removing the uneven, cartilage-heavy section so the remaining rack is easier to cook, handle and slice.
$19/year
Less than $1.60 a month, billed annually.
Renews yearly until canceled.
Already a member? Log In
You do not have to trim spare ribs this way to make good barbecue, so if you want to smoke the full slab, that is fine. These instructions are for the times when you want the rectangular rack without paying someone else to do the trimming, and I will show you where the extra pieces can be put to work as well.
Get the Rack and Cutting Area Ready
Remove the ribs from the packaging, pat them dry and place them bone side up on a stable cutting board with enough room to work. A sharp boning or chef's knife, some paper towels and a nearby pan for the trimmings are about all you need.
Keep the ribs cold until you are ready to prepare them, since a cold slab is easier to handle than one that has been sitting around getting soft and slippery. If the rack is already labeled St. Louis style, inspect it for the membrane, loose pieces and any heavy fat, but you may find that most of the work below has already been done.
Remove the Loose Flap on the Bone Side
Look for a flap of meat lying across part of the bone side, sometimes called the skirt, and lift it so you can see where it joins the rack. Cut along that attachment close enough to free the flap without digging down between the ribs.
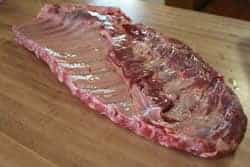
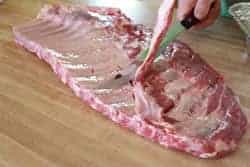
Set the flap in your trimmings pan rather than throwing it away, since it can be seasoned and smoked along with the other pieces. It is thin and may finish much sooner than the rack, which makes checking it separately part of the plan.
Find Where the Rib Bones End
Run your fingers along the slab to feel the ends of the firm rib bones and the softer cartilage beyond them. The line is not always perfectly straight, so take a moment to locate it before putting the knife to the meat.

You may see this tip section described in older rib instructions as the brisket bone section, but the practical point is to find the transition from the long rib bones into the cartilage and breastbone area. You want to cut along the softer line and leave the main rib bones in the rack, rather than try to saw through them with a kitchen knife.
Cut Away the Tip Section
With the rack secure on the board and your fingers away from the cutting line, make a deliberate cut along the length of that transition. Several controlled passes are better than forcing the blade through a place that does not want to cut, and if you hit solid bone, stop and check your line.


Once the tip strip is free, look at the remaining rack and trim away an unusually thin, ragged end if it will clearly overcook before the rest. You are making the slab more manageable, so there is no need to keep trimming good meat simply to produce a perfect rectangle.
Remove the Membrane and Tidy the Surface
Lift an edge of the tough membrane on the bone side with a butter knife or the end of a spoon, then use a paper towel to pull it away. If it tears, start another section and work across the rack, using the membrane removal guide if you need a closer explanation.


Trim thick, hard deposits of surface fat and any loose scraps that are likely to burn, but leave the fat within the meat alone. The goal is a rack with reasonably even thickness and no obvious pieces hanging off the edge, rather than a completely bare slab with every bit of fat removed.
Put the Trimmings to Work
The tip strip contains cartilage, so plan to eat around those pieces or cut the cooked meat away before adding it to another dish. Season it and smoke it alongside the rack, checking it independently because its shape and thickness will not match the remaining ribs.
My smoked rib tips recipe is a good place to start, and cooked trimmings can also add a lot of flavor to beans. If you will not use the raw pieces during this cook, package them for the freezer promptly rather than leaving them on the counter while the main rack smokes.
Season and Smoke the Trimmed Rack
Once the trimming is finished, the rack can be seasoned and cooked just like other St. Louis ribs. The complete pork rib guide covers the whole process, while my 3-2-1 St. Louis spare rib recipe gives you a specific wrapped approach to follow.
If you want to trim the night before, keep both the rack and the saved pieces covered in the refrigerator until cooking time. You can season them ahead as well, and my original rub is very low in salt, so a generous coating also works with ribs you have brined. If you use a different rub, check its salt level before combining the two.
Don’t Lose This Article
Enter your email and I’ll send a link to this article straight to your inbox so you can read it anytime.